Unfortunately most snacks are not healthy, especially those that are sweet or crunchy. Well, I have the perfect healthy snack that is both sweet and crunchy.
Apple chips!
These delicious cuties are the perfect answer to your sweet tooth and won’t add any inches to your waist.
Plus, with fall in full swing you’ll be able to use the sweetest, freshest apples of the year.
My only complaint about them is that they do take a long time to make.
Two hours.
Yeah, I know. But, all that time they are just sitting in the oven. You can go on with your daily activities while they crisp away.
And now to try out my new recipe maker ( you can print it right off my blog post!):
APPLE CHIPS
Serves
1
Prep time
5 minutes
Cook time
2 hours
Total time
2 hours, 5 minutes
Dietary
Diabetic, Gluten Free, Vegan, Vegetarian
Meal type
Snack
Misc
Child Friendly
INGREDIENTS
1 large apple (Fuji, gala, or granny smith)
mandolin
DIRECTIONS
Step 1
Preheat oven to 225 degrees. Wash and core (if desired) your apple. You don’t have to core the apple (see picture of my chips) but can if that’s the look you prefer.
Step 2
Using a mandolin, thinly slice the apple (if you don’t have a mandolin you could use a very sharp knife, but the slices need to be very thin)
Step 3
Place apple slices on a parchment paper lined baking sheet (slices from the entire apple will take up two baking sheets)
Step 4
Sprinkle with a dash of cinnamon (if desired)
Step 5
Place your baking trays in the oven and bake for one hour. After one hour flip the chips over and then continue cooking for another hour.
Step 6
After cooking time is up, turn off the oven and allow the chips to cool inside the oven. Enjoy your guilt free chips!
As I announced last week, Dave and I are expecting our first child! Baby Ly is tentatively scheduled to arrive on May 26, and we couldn’t be more excited.
For us, getting pregnant was not an easy task.
It was a journey filled with let downs, heartbreak, many cries on my dog (she is a great comforter), but also growth, peace, and eventually happiness. When I look back on the last 2 1/2 years I can see how God was with us the entire time, and how He was just waiting for us to trust in His perfect timing.
I want to write this to encourage and give hope to all those couples out there who are dealing with infertility issues. I want to share my story to let you know that there is always hope and that all things are possible with God. And although I don’t know God’s plan for life specifically, and I don’t know if He will bless you with a child, I can promise that if you trust Him He will fill your life with more joy and peace that you could ever imagine.
Here’s our story: (oh, and just to warn all my male readers, I’ll be sharing some personal girly things- just so you know)
When I was about 23 years old I was diagnosed with polycystic ovarian syndrome, or better know as PCOS. The diagnosis came after multiple trips to multiple doctors and some painful symptoms. I had so many cysts that they were pushing on nerves and causing terrible leg pain. Another tell tale sign of my PCOS was the fact that I had never had a regular period, or been able to have a period without medication (from the end of high school on). The doctors said my lack of periods could be causing the cysts to pile up, which was causing my pain.
The doctor put me on birth control in order to make me menstruate each month, and I stayed on it until Dave and I were married in 2010. When we got married we had planned to wait a year or two before “trying” to have kids. That was our plan, but God soon let me know He had another plan for us.
About three months after we were married I called my OBGYN to refill my birth control prescription, and I got an overwhelming sense that I was doing something wrong. I can’t explain it really, I was just being convicted by the Holy Spirit to not go back on birth control. I felt God saying that by being on birth control we weren’t trusting in His timing, we were just trying to manufacture our own. Now, before I go any further I want to say that I do not feel that using birth control while married is wrong. I think that it is a very necessary thing for many couples, and I don’t have a personal conviction against it in general—God was just convicting me of our own situation.
I told Dave that night that I felt I should get off of birth control, and he let me know he felt the same way. It was a very scary thing, let me tell you! I remember even crying because I wasn’t sure if I was ready to let go of that type of control. In my head I thought that as soon as we “pulled the goalie” I would get pregnant, but that’s not exactly how it happened.
You see, I wasn’t ovulating on my own. And since I stopped taking birth control, I also stopped getting my period and some painful cysts came back.
3 months went by, 6 months, 9 months, and then a year. Nothing.
At that point I was taking a pregnancy test once every month, and every time the test would come back negative it would break my heart.
A little over a year after we started informally trying, I started getting some early pregnancy symptoms. I knew it was too early for anything to show up on a pregnancy test, but I really believed that this was it! A few days later while I was at work I started getting really intense period-like cramps. I was sad because I figured I was just getting my period for the first time (in months!) and was not pregnant after all. A few hours after the cramps started I started bleeding very heavily (while I was still at work). It was not like any period I had ever known. The pain and bleeding was so intense that I was worried I wouldn’t be able to drive myself home. I remember praying the whole car ride, which thankfully was only 15 minutes, that God would stop the pain and bleeding and save my baby. But the bleeding and cramps didn’t stop, and I soon started passing large blood clots.
I was having a miscarriage.
Having to pass all of the blood and blood clots was traumatizing to say the least. I had to take off a week from work and spent most of the days crying or just staring at the wall. It was hard enough to know that we had lost a baby, but it was worse having to feel it all come out of me. Still, God remained faithful and I soon realized how good He had been in that situation. I realized how much harder it would have been to lose the baby at 12 weeks or even later, and He had saved us from that heartbreak.
Following the miscarriage I had several invasive procedures to try to figure out the source of the miscarriage, and they discovered I had a polyp on my uterus. So I went into surgery to have a D & C and polypectomy. Then a few months later we started trying once again to get pregnant.
I was worried that we’d have trouble conceiving due to my PCOS, so I asked my OBGYN if I could get on fertility medication to help me ovulate. Before they would give me the medication, Clomid, they had me endure another invasive procedure. I had a hysterosalpingogram to check my uterus and to see if my fallopian tubes were open. All looked normal, and I was excited to start the Clomid. However, I had a really hard time getting the medication. The nurse wouldn’t call me back, or they’d say they wanted me to take another test. It seemed like every time I tried to get Clomid a door was shut in my face. I was starting to panic because I was leaving my job and my insurance was about to expire. I wasn’t sure if I’d be able to get access to the same medication on Dave’s insurance and so it was like watching the clock countdown. I kept praying that God would help me get the Clomid, but it wasn’t happening.
Finally, at the last minute I got ahold of the Clomid. But once I had it, I had that same feeling I had had a year ago with my birth control. I realized that maybe the reason why it had been so hard to get was because God didn’t want me taking it. Once again I was trying to trust in my own power to make this pregnancy happen, and I wasn’t trusting in His. So the Clomid sat in my drawer and I decided not to take it.
In August (of 2012) I finally gave the whole infertility issue up to God. Instead of looking for solutions myself, I looked to Him. I felt compelled to get my body healthy and try to rid myself of PCOS naturally. I completely change by diet, taking out refined sugar and refined carbohydrates. I was eating tons of fruits and vegetables each day, and also working out more consistently. I started losing weight, and I felt absolutely fantastic! After about a month of my new diet I was shocked when I got (what I thought was) my first “natural” period in over ten years. I was amazed at how quickly my body had regulated itself, and it encouraged me to keep on with this new healthy lifestyle.
But soon I didn’t feel so great. I started feeling really nauseous and extremely tired all the time. I didn’t understand why all of a sudden I would feel this way when I had been feeling so good. A little voice inside me started saying “hmmm what if you’re pregnant?” But I didn’t think that was possible at all since in my mind I had just had my period. Still, the symptoms didn’t go away and I was starting to drive myself crazy with the “what if’s.” So on Monday, September 24th I took a pregnancy test—not because I thought it would be positive, but so it would say “negative” and could just stop obsessing about it.
You can imagine my COMPLETE surprise when it was positive! In fact, my first reaction after I saw it was to throw up.
And…I’m BACK! I have been quite the slacker blogger as of late. In my defense I’ve been helping reno a basement…
…and gallivanting around Chicago with family. (Posts on both to come!)
But today I’m going to share my first attempt at sewing an article of “clothing”, a baby bib. It was SUPER easy and FAST! From start to finish I was done with this project in 30 minutes, easily.
I made this bib for my friend, Kirra, who just gave birth to a perfectly beautiful little girl, Eliana. You can see more of the gifts I made her for her baby shower here.
To make a bib you’re going to need:
*You will also need a sewing machine and matching thread*
Step 1: Make a Pattern
I didn’t have a pattern for a bib, so I just took some newspaper and one of my nephew’s bibs to make one.
*If you don’t have another bib on hand, just free hand draw this step*
Fold the bib in half, trace it onto the newspaper, and cute it out. Voila! A lovely little pattern.
You’ll notice in the picture above that my pattern is slightly larger then the bib I traced. I just traced 1/4 inch outside of the bib to allow for a seam allowance.
Step 2: Trace pattern and cut fabrics (fold fabrics in half first)
Pin your pattern to your folded front fabric (I used a cotton print), folded back fabric (I used a piece of fleece), and folded terry cloth (I used a washcloth I had from another craft) and cut.
Be sure to pin the pattern so it lines up with the folded edge of your fabric.
Step 3: Layer and pin fabrics
Once your three fabric have been cut, layer them in the following order:
Line up the fabric edges, and pin.
Step 4: Sew perimeter of bib (leaving 3 inches open)
Take your bib pieces to the sewing machine, and sew around the perimeter.
Be sure to leave about 3 inches open so you will be able to pull the bib right-side-out.
Step 5: Turn bib right side out and top stitch around
Lastly, turn the bib right side out so that the terry cloth layer is between the front and back fabrics (this will help absorb all those messes).
Iron the bib flat, then top stitch around the perimeter, closing up the space you left open. The top stitch can be any stitch you want, I used a zig zag.
Step 6: Sew on Velcro tabs
*Totally forgot to take pictures of this step* Sew small Velcro tabs on to the top of the bib. Remember to sew one piece on the front side of the bib, and one on the back so they will overlap when placed around baby’s neck.
Hey guys! I’m sorry I’ve been a little flakey on the blog front. I want to say how appreciative I am of all your support and prayers of our news to move to Taiwan. I’ll be sharing more details this week!
But now I want to share a little project that I first mentioned when I gave my camera strap tutorial.
I don’t know about you but I am ALWAYS misplacing my lens cap. I sometimes spend more time looking for my lens cap than I do taking pictures.
This little pouch is a total life saver time saver and it’s not too difficult to make. There are several little steps, but each one is not complicated.
I know some of you are afraid of sewing, but if you just follow the tutorial step by step I know you can make one too!
Here’s what you’ll need:
-An outer fabric of your choice (only a small amount is needed!)
-A lining fabric
-Sew-on Velcro
-Bias tape
-Batting
-Matching thread and sewing machine
Step 1: Cut the following from your fabric
*The flap shapes in this picture I modified later on–See below.*
Step 2: Construct the two sides of the pouch but stacking your lining, batting, and outer fabric like so:
*These two sides are identical, I just turned one over to show the order the pieces.*
Step 3: Cut two strips of your outer fabric to make the piece that will attach the pouch to the camera strap. It’s length should be the width of your camera strap + 1/2 inch (give or take) and the width about 1 1/2 inches.
Step 4: Place right sides of the fabric together and sew both long ends, making a tube. Then, turn the tube right side out (I had to use the end of a seam ripper to to it).
Step 5: Pin your tube to one of the pouch sides using your camera strap as a guide. Place pins on either side of your camera strap, this is where you will sew.
Step 6: Take out the camera strap and sew where your pins are, securing the tube to one side of the pouch.
Step 7: Construct the closing flap by first sewing a piece of Velcro to the lining piece. Then sew the lining to the outer fabric piece (right sides together) and turn inside out.
*See how I changed the shape of the table from the pictures in step 1? This shape works better!*
Step 8: Pin on the flap and then sew the flap onto the pouch side where you just sewed your tube.
Step 9: Take the other pouch side (the one you haven’t done anything to yet) and sew a piece of bias tape across the top.
Step 10: Sew the other side of your Velcro in the middle of the pouch side, right under the bias tape. *Tip: lay the two pouch sides together and pull the flap over to see where you should place the other piece of Velcro—you obviously want them to match up*
Step 11: Now your two pouch sides have all their bells and whistles so you just need to sew them together! Place the two sides right side together, stitch around the outside, and turn inside out. Your pouch is done!
Slip your camera strap through the back of the pouch and you’re all set! Never lose your lens cap again!
It’s 5:30 P.M. You’ve just gotten home from work or errands and that question that has crossed your mind so many times before pops up again:
“What’s for dinner?”
You freeze up in fear knowing that hungry bellies are waiting for an answer, but you don’t have one. You quickly scan through your pantry and fridge and realize that you haven’t been to the store in a week. Basically, you’re in trouble.
We’ve all been there before, right? Well, today’s recipe is your life saver. It’s ingredients are items that you most likely will always have on hand in your pantry and fridge and it’s super easy to make.
This recipe actually came about one night when I faced the same aforementioned problem. I put together what I had and this recipe was born. Dave loved it so much that it’s affectionately known as “Dave’s Casserole” around our house. (you can see it here on my new menu board)
So here are the ingredients you’ll need:
2 cans tomato sauce, 1 can diced tomatoes Shredded cheese (I’ve tried using cheddar and 1 or 2 cans of cream of mushroom soup mozzarella and both taste great!)
Pasta (any shape will do except Ground turkey (you could also use ground beef instead, for spaghetti or linguini) this is just my preference)
That’s it! I bet you have most of those ingredients on hand at anytime. The ingredient that makes this different than just your regular baked pasta dish is the cream of mushroom soup. It adds a great flavor and creaminess to the recipe. I recommend using two cans, but if you’re not big on the mushroom flavor you could just add one.
Step 1: Preheat your oven to 350 degrees
Step 2: Fill a pot with water and set on the stove to boil. You will need enough water to cook one box of pasta.
Step 3: While the water is warming up, add your ground turkey to a skillet. You want to use one with the tallest sides possible. Break it into chunks and brown over medium heat.
If you’re new to cooking ground turkey it’s good for you to know that it doesn’t actually “brown.” It turns more of a grey color when it’s cooked. If you keep waiting around for it to “brown” then it will be overcooked.
Step 4: Drain the fat from the ground turkey (or beef if that’s what you’re using)
Step 5: Once your water is at a rolling boil add some salt to the water (for flavor) and a dash of olive oil (to keep the pasta from sticking to each other). Then, add your pasta. Cook until al dente (or slightly firm).
Step 6: Once the pasta is cooked, drain the water and then place your cooked pasta into a 9×13 pan.
Step 7: Place the drained ground turkey back into the skillet you used before. Add the cans of tomato sauce, diced tomatoes, and cream of mushroom soup to the ground turkey. *You could also add some shredded cheese to the mixture add this point*
Step 8: Mix the ingredients together and cook over medium-low heat until it begins to simmer.
Step 9: Pour the meat/tomato/mushroom mixture over the cooked pasta in the 9×13 pan
The liquid from the diced tomatoes and tomato sauce will allow the mixture to seep down into the dish, covering all the pasta.
Step 10: Cover the casserole with shredded cheese.
I actually prefer cheddar cheese, but mozzarella is what I had on hand. You can be as liberal or as stingy as you want with the cheese.
Step 11: Bake in your pre-heated oven for 20 minutes or until the cheese on top is melted.
After removing from the oven let the casserole set for 5-10 minutes and then serve to all the hungry bellies in your home!
Have you marked your calendar…?
Trade School will start on March 6th. Kelli and Kristi from Lolly Jane Boutique will be kicking off the series…I.Can’t.Wait!
It’s no secret that I have a love for making over discarded furniture. It’s even better when it’s free! Where would you find free furniture you ask? Well, it might be waiting right outside your door.
I’m talking about in the alley.
People leave all sorts of things in the alley, and sometimes they just need a little TLC to really sparkle and shine.
And the alley is exactly where I found my latest project.
I was walking to my car one day after work and I spotted some items in the alley on the other side of our parking lot fence. There was a small dog or cat kennel, some scrap wood, and a bar stool.
The scene of the crime. (Photo taken with my phone, hence the bad quality)
As soon as I saw the bar stool I immediately thought “that looks like a plant stand.” Don’t ask me why that popped into my head. So I stuck my arms through the bars of the fence, grabbed the stool, and shimmied it up and over and into the trunk of my car.
Yeah, that’s right. I’m one of those people.
Here is the stool that I took from the alley:
I probably thought of a plant stand because this stool seems unusually skinny and narrow.
Here is a close-up:
Notice all those little nails? Such a pain to take out!
To begin the transformation I removed the seat from the rest of the stool.
Then, I took off the L brackets and began removing all those stinkin’ staples and nails. There were lots!
This pile is only half of all the nails and staples!
About 30 minutes, and 3 blisters, later I was ready to take off the old leather covering. My plan was to take off the cover and re-use the original wood from the seat.
However, when I pried up the leather I found this:
MOLD!
And lots of it!
There was no way I was going to even try and scrape this off. The whole seat had.to.go!
So, I had to improvise a new top for my plant stand. Luckily we had some already cut pieces of MDF from another project we will probably never finish haven’t gotten to yet.
It fit perfectly!
Now that I had all my wood ready, it was time to paint. I used some white paint, from Martha’s discontinued line, that I already had in the house.
All the wood got 3 good coats and were ready to go!
I wanted to give the top of the plant stand a little pizzaz so I decided to add a chevron pattern. Gotta love chevron, right?
I’m a don’t-like-to-measure-eyeball-everything kind of girl, so for making this pattern I just used painter’s tape and eyeballed the lines.
It’s not perfect, but I wasn’t too worried since most of it would eventually be covered by a plant.
Before I painted it grey I used a gift card to smooth down the tape to make sure no paint could seep under. Seeping paint=not crisp lines.
Next came the grey. I used a sample-sized pot that I had purchased when testing out colors for my topless table.
Now the trick for getting crisp lines is to remove the tape when the paint is just dry to the touch. If you wait too long you’ll end of peeling some of the paint up.
Not bad for eye-ballin’ it, right?
Now you probably noticed that the grey paint could use another coat. I did go back with a small craft brush and fill in the parts that needed it most. But again, a plant would be covering it so I wasn’t too concerned.
Then came 2 coats of poly to seal the paint and protect it from any moisture that might come from the plant pots.
The last step was to attach the chevron top to the rest of the stand.
{Enter my tool man-Dave.}
He drilled long screws down through the top into the legs of the stand.
All done!
But what is a plant stand without a plant???
I wanted to go with something that was cheery and vibrant green. I really don’t know much about plants so my only criteria was the color and a plant that only needed medium light.
I went with this sunny yellow pot because I knew it would go well with the grey and because it’s such a happy color. Oh how I long for spring to be here!!!
During the day our curtains are closed since we’re at work. So, this guy will not be getting this much light during the week.
Pretty cute, right?
The total cost for the plant stand was zero point zero dollars. Total cost for the whole project was $15.00 ($5.00 for the plant and $10.00 for the pot).
So, do you have any old bar stools laying around that you could convert to a plant stand?
Have you searched the alleys around your home for diamonds in the rough? Well, get a’lookin’ cause there are great things to be found!
By the way, if you have a lot of trees in your property and you want them to get rid, a reputable tree arborist from AlexandriaTrees.com can help you remove them or improve the health and appearance of trees on your property including cases where the tree is dead or dying and when it’s obstructing construction or preventing other plants from growing.
Don’t forget…
be sure to spread the word about my Trade School series that will start on March 6th. I’d love for you to grab my button (right on my side bar!) and spread the word.
Well, here are all my secrets, sources, and sewing tips from the quiet book I debuted a few weeks ago. I hope that they will be useful to you and will inspire you to create one of these books too!
I simply ask that if you use any of my original templates or ideas that you kindly link them back here, just as I’ve done with the templates that were not my own ideas. Other than that, enjoy them all!
To create the quiet book page:
You will need lots of muslin. This material is super durable and easy to work with.
1. Decide on your desired page size and create a template. To make things easy on myself I decided to use a piece of 12×12 scrapbook paper as my template.
2. Fold the muslin in half so you can get two pages with just one set of cutting!
3. Trace your template onto the folded piece of muslin
Step 4: Place pins in each of the four corners (to ensure identical size in both layers of muslin) and cut out your page. I’m not a fan of rotary cutters so I just used plain scissors.
Step 5: Decorate those pages! (Templates are below…read on). After you have sewn all of your felt shapes onto the pages you will turn two pages together, right sides facing. (sorry no pics of this!)
I also used a layer of interfacing between the pages (for extra “oomph”). If using a layer of interfacing you will need to cut it the same size of the pages (12×12 in my case.)
Step 6:
Layer the pages as shown in the *lovely* diagram below to make a little “page sandwich”:
Step 7: Use LOTS of pins and pin the pages together (as shown above) Sew, using a 1/2 seam allowance around the edges of your “page sandwich”. BE SURE TO LEAVE 3 INCHES UNSEWN ON ONE SIDE!
Step 8: Use the opening you left to pull your pages through so they are facing the right way. The interfacing should now be sandwiched between the two pages (which are now facing, right sides out, away from each other).
Step 8: Hand stitch the opening closed.
Now for the fun stuff!
Here are links to templates for each page. When you click on the “Adventures of Our Fami-Ly” links you’ll end up in my Google Docs and can just print the template from there. If I used a template from another site you can click on through and print from their site.
Template: Homemade by Jill
Template: Quiet Book Blog
Template: Adventures of Our Fami-Ly, Quiet Book Blog
Template: Homemade by Jill, Adventures of Our Fami-Ly
Template: Homemade by Jill
Templates: Adventures of Our Fami-Ly (page 1), Adventures of Our Fami-Ly (page 2)
Template: Adventures of Our Fami-Ly
Template: Adventures of Our Fami-Ly
Template: Adventures of Our Fami-Ly
*I used binder rings to hold all the pages together. If you want to do this simply put eyelets or grommets on one side of your page. You can use a piece of notebook paper to give you a template for holes that are evenly spaced apart.*
To make the cover:
Step 1: Cut two rectangles of fabric: To find your width: (page width x 2) + the diameter of your rings + 2″ for overhang + 1″ seam allowance. To find your height: page height + 2″ for overhang + 1″ seam allowance.
Since I had lots of muslin left over I used it and a piece of printed cotton.
Step 2: Turn the fabric right sides facing, and sew them together using a 1/2 inch seam allowance. BE SURE TO LEAVE 3 INCHES OF FABRIC UNSEWN!
Step 3: Using the 3 inch opening, pull your fabric right sides out then hand stitch the opening closed.
Step 4: Make a strap to hold the cover closed. Cut a strip of fabric 8 inches x approximately 14 inches. (Your length will be based on the thickness of your book)
Step 5: Fold the strip of fabric in half (so it is now 4 inches) and pin the opened side.
Step 6: Stitch completely around the rectangle’s perimeter using a 1/4 seam allowance.
Step 7: Stitch a piece of sew-on Velcro to one end of the strap Fold your cover in half and decide where you’d like the strap to attach (this is on the front cover.) Then, sew on the other side of the Velcro in that spot.
Step 8: Place your finished pages inside the cover (this will give you an accurate placement of your strap). Attach one end of your strap to the book using the Velcro pieces you already sewed on. Then, bring the strap around the book to the back. Pin where you want the end of the strap to go.
If your strap is too long (like above), just cut off the end where you placed your pin.
Step 9: Carefully take your pages out of the cover and sew the strap to the back side of the cover.
Step 10: This step is optional if you want to attach your pages with binder rings.
Open your cover flat and mark the center. Then measure half the diameter of your rings to the left and right of the center mark. Use the same template you used to mark the holes on the quiet book pages and place in your eyelets or grommets. (sorry no pictures of this step)
Well, that’s how you make a quiet book.
Plus many hours of sewing.
If you have made a quiet book, or use any of my ideas, I’d love to see them! I think these little books are so cool and a great way to teach children different skills.
Looking for a cheap, quick, and delicious breakfast recipe? Look no further. These breakfast cups made from scrambled eggs, bacon, and shredded cheese are the perfect addition to a brunch spread or breakfast table. And since the egg, bacon, and cheese is contained in a delicously-doughy cup, they are super portable and easy for kids to eat!
Here’s what you’ll need:
Muffin tin Eggs (5 eggs per 6 breakfast cups)
Bacon (I use turkey) Shredded cheddar cheese (reduced fat)
Crescent rolls
Step 1: Preheat your oven to 350 degrees and spray your muffin tin with non-stick cooking spray. You want to get good coverage of the spray inside of each of the muffin cups so everything comes out nice and easy later on.
Step 2: Open up your package of crescent rolls and divide the dough into triangles. It’s easiest to just lay them out on a piece of wax paper.
Step 3: Take one triangle and place the widest part of it on the bottom of a muffin cup. A tail of dough should be hanging out the side.
Step 4: Take a sharp knife and cut off the “tail” of the dough. Then use it to line the part of the muffin cup that isn’t already covered in dough.
Repeat this process for the remaining muffin cups. Then, put the muffin tin in the refrigerator to chill while you prepare the filling.
Step 5: Place your bacon on a microwave safe plate and cook in the microwave for 3 minutes-turn the plate-2 more minutes. (You could also cook it on the stove but this method is faster and you don’t have to worry about watching it in a pan).
For 6 breakfast cups you only need 3 pieces of bacon—I made extra so Mr. Ly could have a snack while he waited. Extra bacon is never a bad thing in my opinion.
Step 6: Crack your 5 eggs into a bowl. Add 1/4 cup milk and scramble the yolks using a fork or wire whisk. Then, add salt and pepper to taste.
Step 7: Put your egg mixture into a pan and cook over medium-low heat for approximately 5-8 minutes.
You want the eggs to be firm but slightly runny. The eggs will finish cooking later in the oven.
Step 8: Take your muffin tin out of the fridge and spoon the scrambled eggs into each cup. (As you can see from the glare on the pan I used lots of non-stick spray!)
Step 9: Take your cooked bacon out of the microwave and crumble pieces on top of the eggs.
Step 10: Top the eggs and bacon with some shredded cheese.
Step 11: Place the breakfast cups into the pre-heated oven and cook for 15 minutes or until the edges of the crescent rolls are golden brown and the cheese is melted.
Step 12: Once the cups are finished, remove from the oven and run a sharp knife around the edges of each muffin cup.
Step 13: Serve and enjoy!
Here’s a shot showing how nicely they hold up even after a big bite!
“Having once decided to achieve a certain task, achieve it at all costs of tedium and distaste. The gain in self-confidence of having accomplished a tiresome labor is immense.”
— Thomas Arnold Bennett
This quote pretty much sums up all my sentiments regarding this quiet book project.
For being just 10 pieces of muslin and a million pieces of felt it sure did take a lot out of me. You can read more about my journey to finish this book here, here, here, here, and here.
All of the following pictures were taken before I put grommets on each page and used rings to connect them all. I wanted to photograph them in their original-non-whole-punched form.
Here is the line-up of all the pages:
And now for a close up look. I named each page after a song just to spice things up a bit.
The cover of the book is this cotton print with muslin on the underside. I sewed a strap on the back that wraps around and attaches to the front with a piece of Velcro.
Strap attached to the back of the cover
The underside of the strap coming from the back of the cover
Strap wrapping around to the front cover
Velcro on the front cover where it attaches to the strap
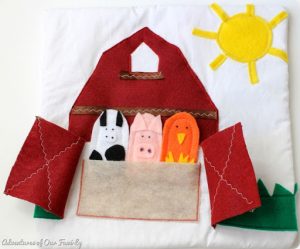
Page 1: “Old MacDonald Had A Farm”
Source of templates: Homemade by Jill
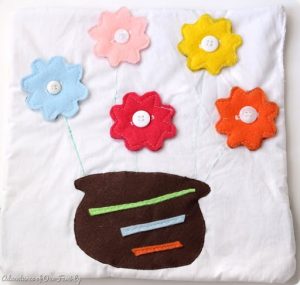
Page 2: “Where Have All the Flowers Gone”
Inspired by: Quiet Book Blog
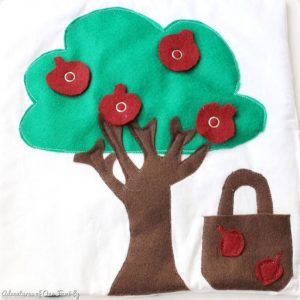
Page 3: “…for giving me the things I need: the sun and the rain and an apple seed”
Inspired by: Quiet Book Blog
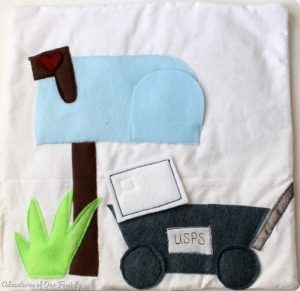
Page 4: “Signed, Sealed, Delivered I’m Yours”
Templates from: Homemade by Jill, my original ideas
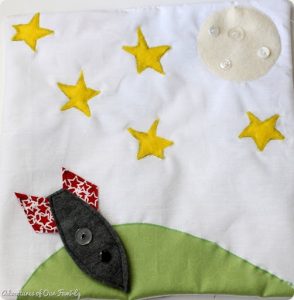
Page 5: “Fly Me to the Moon”
Templates by: Homemade by Jill and my own ideas
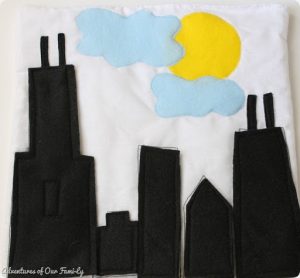
Page 6: “Sweet Home Chicago”
My own original ideas and templates
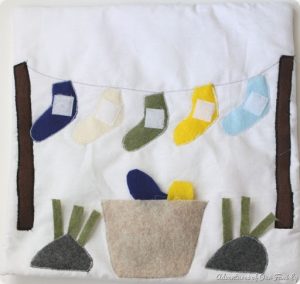
Page 7: “Dirty Laundry”
Inspired by: Imagine Our Life, templates and design by me
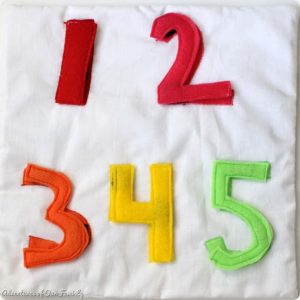
Page 8: “1-2-3-4 get your woman diaper on the floor”
Inspired by: Quiet Book Blog
Page 9: “ABC is easy as 1-2-3”
Inspired by: Quiet Book Blog
Page 10: “Hit ‘em hard, hit ‘em low. Go Northwestern, Go!”
Inspiration: original ideas and templates by me
To make this wildcat image I literally just held my piece of felt up to my laptop screen and traced the image I found on Google. I thought it was kind of genius.
Well, that’s it. Hours and hours of tracing, cutting, pinning, sewing, hand stitching, and countless cups of coffee later I’m finished. Now I understand why people charge up to $80 for these on Etsy!
Sorry I’ve been MIA for a few days, I had a pretty crazy weekend of hosting a bridal shower, celebrating my sister’s 30th birthday, and having a Chinese New Year get together with the family. I was so exhausted today at work, I am already anticipating this upcoming weekend big.time!
I thought I’d start the week with a tutorial on a little hobby I’ve picked up recently-hand sewing. I found some tutorials on Pinterest, but honestly they were a bit confusing. I eventually figured it out, and decided to write a tutorial of my own. This one makes sense to me, and hopefully it will makes sense to you too. (Oh, and get excited for my video tutorial debut at the bottom of the post!)
Hand sewing is so fun and the possibilities of design, words, fonts are endless.
Here’s what you’ll need:
-Embroidery floss (colors of your choice)
-Embroidery needle
-Self-healing mat
-Push pin (or safety pin)
-Cardstock
How-To:
Make a template of the word/words/image that you want to sew. I chose to use my own handwriting, but you could choose a font you like and print something from your computer.
Since it’s Valentine’s Day season I thought I’d make something lovey dovey. I like very simple designs and wording, so I simply went with “forever.”
Cut your word out to make the template then tape it to a piece of cardstock
Use a push pin and punch holes along the lines of your letters (or an image). Space them out about an 1/8 inch. Follow along the natural pattern of how you would write the letter. The holes are going to be your guide to show you exactly where to put your needle when stitching.
If you get to a point where lines intersect push the pin right in the middle of where all lines intersect and continue to follow the lines of the letters
When you’re finished take the template off the cardstock and you are ready to sew!
Hand sewing how-to:
Cut an arm’s length of embroidery floss. The floss is made of up 6 individual strands of thread.
Separate the floss down the middle so you have two pieces with 3 strands in each. To separate hold three strands in each hand and slowly begin pulling the floss apart.
Take one of your new 3-strand flosses and set aside. Take the other 3-strand floss and fold it in half. Now you should have 6 strands again on the end!
Thread the 6 strands through an embroidery needle.
Now we’re going to secure the floss to the paper. Using the holes you punched in your template as guide, find the first hole at the end of the letter (or image). Push the needle, from the back of the paper to the front, through the first hole.
Your needle should now be on the front side of the paper. Pull the floss through, but not all the way. There should be a loop left on the back side of the paper.
Sorry for the blurry picture.
Now that the needle is on the front side of your paper, push it back down through your paper from front to back using the next hole in your punched guide. There should now be a stitch in the front of your paper.
With your needle now in the back of your paper, thread it through the loop that you left. Pull tight. Your thread is now secure on your paper!
For this hand sewing we’re going to use a backstitch.
Going from the back of your paper to the front push the needle through the next hole in the guide. Pull the thread through to the front.
Now, you’re going to stitch backward (hence the name “backstitch”) into the previous hole. Pull the thread through to the back to create another stitch.
With your needle now in the back of the paper, proceed to the next hole in your guide and push the needle towards the front.
Keep following the guide of the holes your created with the push pin using the same steps (stitch back to front, back stitch).
The back should look like this:
The front should look like normal, continuous stitching.
In case these directions aren’t clear enough for ya I even made a little video!
Yikes! Please excuse the dirty nails, eww.
When you’re finished, or when the floss is almost gone, here’s how to tie off your stitch.
With your needle on the back side of your paper take 3 of the 6 strands out of the needle eye.
Thread the needle (with only 3 strands in it!) under any stitch and pull through.
Now the two sets of 3-strands should be on the same side of the stitch. Tie them and make several knots.
Trim the excess, and you’re now secure! Oh, and because I have nothing better to do I made a video on how to tie off your thread too!
If you are not finished stitching your letters/image then follow the same steps from above to start and secure your new thread. Start in the next hole on your guide with the new thread and push the needle to the front.
Remember not to pull the thread completely through, and to leave a loop in the back!
With your needle and thread in the front backstitch back into the last stitch from your old thread.
Pull your needle through the loop in the back to secure the thread and continue with the backstitch pattern until you are finished!
My finished “forever” turned out quite cute I think.
I framed it and put it on the mantle next to the mini pom-poms I made about a month ago.
I also made this one to remind me of the perfect love I experience with the Lord.
See the crinkling in the paper? That’s what using flimsy card stock will do.
Oh, and just because I’m completely crazy and think that I have all this time on my hands, I’m also going to get started on this:


![Quiet-book-Chicago-skyline-template-[3]](http://adventuresofourfamily.com/wp-content/uploads/Quiet-book-Chicago-skyline-template-25255B325255D_thumb.jpg "Quiet-book-Chicago-skyline-template-[3]")


![Counting-numbers-quiet-book-page_thu[1]](http://adventuresofourfamily.com/wp-content/uploads/Counting-numbers-quiet-book-page_thu25255B125255D_thumb.jpg "Counting-numbers-quiet-book-page_thu[1]")
![Northwestern-football-quiet-book-pag[4]](http://adventuresofourfamily.com/wp-content/uploads/Northwestern-football-quiet-book-pag25255B425255D_thumb.jpg "Northwestern-football-quiet-book-pag[4]")